Sunday, September 18, 2016

Excited about pendulum possibilities

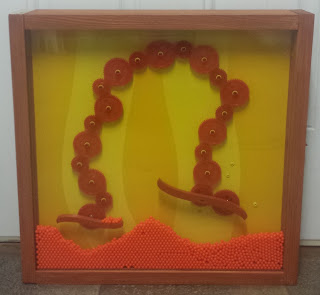
Wow, time flies when you're having fun. Since the previous post, there has been a lot of progress in the pendulum research. This is the resulting project:


The challenge of making the pendulum "bend" in the middle was accomplished by adding some weight to the bottom. This causes gravity to be one of the affecting forces of the motion.

The magnetic force that keeps it in motion is accomplished with a permanent magnet, a hand wound coil magnet and a simple transistor circuit like this one:


The next couple of projects in the queue may require a little more finesse on the strength and timing  of the magnetic pulses. So, as an alternative to this circuit, I'm looking into a programmable control circuit. More fun on the way!


Tuesday, August 2, 2016

Handy little bearings

An interesting online store called Electronic Goldmine sells these little bearings. If you have ever dismantled a computer hard drive it may look kind of familiar.


These are very smooth and have been handy for designing pendulums. 

For my purposes the little threaded nub is in the way, so the obvious choice is cut it off. Bad news is the bearing cage is plastic and the cutting process makes it hot enough to fail. Good news is a damaged bearing needs to be opened up to provide this learning opportunity.


I anticipated small bearings, but I've never seen balls this small before. Pencil tip in the photo to show scale.


Monday, July 18, 2016

Double pendulum early tests

The first experiment trying to push a double pendulum with an electromagnetic pulse resulted in two possible outcomes.

1. Both pieces of the pendulum lined up together and behaved very much like a straight pendulum.


2. The bottom half of the pendulum created enough backlash to slow down the top half. In this case, motion eventually stopped because the electromagnet did not push hard enough to overcome the backlash. 


For future tests I plan to try:

1. Push the top section of the pendulum with double the force
2. Push just the bottom pendulum 
3. Push both parts of the pendulum 

Of course none of these test will provide conclusive information because everything changes when the length of either section is changed or when the location of the magnets are changed. We'll just call this a good start.


Thursday, July 14, 2016

Electromagnetic pulse pendulum

My first foray into adding electronics to a project:


The final project will not look anything like this,
 but it was exciting to get the electromagnetic pulse working as a prototype.  


Sunday, June 26, 2016

BB project part 2

This project has absorbed an inordinate amount of time. The mechanical and aesthetic design has evolved through several changes. 


There were a number of successes along the way. 
 - I gained some experience with 3D printing.
 - I learned more about the using the Cricut vinyl cutter.
 - I learned the wrong way, then a better way to make a drilling jig. 


The axles supporting the "arms" go through the aluminum backing and one layer of acrylic. The alignment required to make all four axles work was quite challenging. In order to see an ending point on this project, I decided to adjust from four arms down to two.


As I experimented with adding more BBs to improve the visual interest, I was seeing improvement until the main drive shaft sheered.


So, this project is not complete but will be set aside for a while until some time when the perfect motor and drive axle come along to make the conclusion possible.

Friday, May 13, 2016

The BB Project

The project drawing started something like this: 


 I've worked out the mounting hardware and the appropriate hole spacing for the gears. I've had some success 3D printing the "arms."


Still having some struggles with motor choice and arm speed. I thought I was set with a battery powered motor and a nice little worm gear combination but it doesn't run as smoothly under load as I would like. Next try will be a synchronous motor, which will have its own mounting challenges.


Lots of trial and error yet to come on the shelf steps. Hoping to find a functional and aesthetically pleasing combination. 


The wood background you see here will be replaced by clear plastic so you can see the gears moving.


The BB pick up by the rotating arm works as well as I could hope. Finished product is still several steps away.


Monday, April 18, 2016

Miscellaneous Things

Thing 1:

The Flicker Lamp is complete. (It uses the slimmed down junction box.)

I call it Flicker Lamp just because of the light bulb choice.

Thing 2:

The next project is started. Plenty of moving parts on this one.


Thing 3:

I've submitted the original Learning Pieces #1, now known as "The Counter" for jury review for an exhibit called Art from the Heartland 2016.  I should know in about a week if it will be accepted for the show.

Thing 4: 

This helped me discover the CaFe website  https://www.callforentry.org where there are countless opportunities to submit art for shows. The only thing slowing me down is that most of them have an application fee.


Tuesday, April 5, 2016

Good photography makes the difference

Most of the pictures I use are just snap shots which are sufficient for sharing a general impression of items I'm interested in talking about. On the other hand, a high quality photograph tells a story by itself. My friend Russ Forthofer took the time to create some images of some of my work. I am very pleased with how they turned out.

If you ever need a professional photographer that does high quality work contact Russ. http://www.forthofer.net/home


Monday, April 4, 2016

Sold!


Yesterday was a fine day for DThornburg Diversions. Frankin-Lamp  was sold!


And moving right along, the next lamp, a lot smaller, necessitated cutting a junction box down to less depth. It wasn't easy, but  I discovered it could be done.


Saturday, March 19, 2016

Steampunk Lamp

In general I am hoping to build things that don't really fit the label of "steam punk" or if they do then they should have some feature that sets them apart from run of the mill. On the other hand, when a friend came to me and said, "I have room in my booth at the game convention if you can pull together one or two steam punk items." It made sense to go that direction.


As a side note... This little blog just hit 1000+ page views.


Tuesday, March 15, 2016

Wrap up one and unwrap the next one.

The pendulum project is nearly complete and ready for presentation.


A photo like this doesn't do it justice, but it gives you the idea. Perhaps a video will be forthcoming.


For unwrapping the next one...  I got a quick lesson on using the sandblaster. I started "unwrapping' a cast iron lamp base that was covered with chipped paint and rust.  Now it can become a lamp base with a whole new lease on life.

Tuesday, March 8, 2016

Progress happens even with mistakes

I decided to use the linseed oil and am quite pleased with the results I got wet sanding the oil. On the oops side of things, I wanted to protect the  wood for overnight storage. Surely a sponge  would make a nice cushion for the wood to rest on. It turns out that a sponge soaks up the linseed oil and leaves a discolored spot on the wood. Lesson learned.


Since this project is going to use several clock motors I decided it would better to run them all from one set of batteries instead of lots of individual ones. To make this happen I need to solder leads to each motor. This is made difficult by the fact that the contact points for the batteries are spring steal. Not a practical surface to solder to. At the end of the day, after several failed attempts, it occurred to me I could put an aluminum pop-rivet through the contact, and have a usable surface. I'll give that a try first thing tomorrow.

Thursday, March 3, 2016

The next project is underway

Gathering the needed supplies,


and making difficult decisions about which oil finish to use on the walnut.


I found this article about wet sanding the finishing oil.  I'm going to try that (option #2) on a sample piece too.


Thursday, February 25, 2016

Finding good vendors

The variety of hardwood suppliers in Indianapolis has dwindled over the years but fortunately the best is still in business. Northwest Lumber always has a good selection of domestic and exotic hardwoods.


On the other side of the coin, I haven't had a good history with metal suppliers. They seem uninterested in small orders and become somewhat impatient if you don't speak the language. The vocabulary required to specify thickness, hardness and the myriad of details needed to ask for a piece of metal is specialized to say the least. Those difficulties went away yesterday when I visited Metal Supermarkets


Not only were they willing to talk to me about a small order, they told me that about half of their business is small orders. I was looking for a sheet of aluminum about 1/8 inch thick. They showed me their selection of end cuts. The one I bought was more than 5 square feet and priced at $2.50 per pound. They were just as willing to cut a piece to order which would have been priced dimensionally.
    They spent a good amount of time with me explaining the various options and quality grades they had available. Thanks guys, I'll be back.


Monday, February 8, 2016

Progress at the studio


The studio still needs a little more shelving and a lot more organization but it was fun to get the logo on the door today.


Thursday, January 28, 2016

Lamp is nearing completion


This interesting piece of hardware was the inspiration for this project. I don't know what it was originally used for, but it does have the Link Belt brand name and the P.I.V. logo. A little research leads me to believe that P.I.V. stands for Positive Infinitely Variable and probably has something to do with a variable speed motor control.


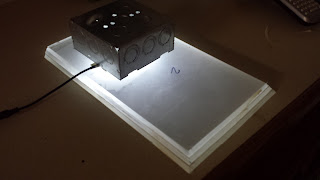
One feature of this lamp is a glowing (lighted) base. A few LEDs imbedded in acrylic should do the trick.  


Miscellaneous electrical components and a vintage glass shade will help too.


When its all put together it looks something like this:


Special features to note: Turn the crank to adjust a dimmer switch for lamp brightness.


 The switch on this side turns on the LEDs that make the base glow.


There are a few more finishing touches to put in place before this project is complete, but it is so close that I am anxious to talk about it.


Friday, January 22, 2016

Logo

Thanks to all the people who have provided input and suggestions on the logo design. I'm pretty sure If I keep seeking guidance from others it would continue to change, but it is time to say I have a useable design.


In most cases I think it will be presented with an "aluminum" color on a black background.

Something like this: 


With this decision made I can get a label plate created so the first project can be declared finished.

Sunday, January 3, 2016

Link Belt Lamp is Started


 I don't know what this was in its former life. It has something to do with a "Positive Infinitely Variable" speed control manufactured by Link Belt.


For its next life I think it should become a lamp. 


A couple of junction boxes mounted to some acrylic should work as a base.


The lamp will extend over the top of this hardware and to add an interesting look to the base...


LED lights


will glow through the acrylic base.