Sunday, February 26, 2017

A Project with an Arduino Nano and Neopixels


I've been hearing tech people talking about Arduino for a while and with this project I got to satisfy my curiosity about them.

Since the project didn't require much memory or processing speed, the Arduino Nano was quite sufficient for the job. Its a tiny little thing less than 1.5 inches long.


It conveniently works with Neopixel LED strings. The set I chose is this style allowing me to place individual lights right where I wanted them.


So the Arduino and the Neopixels are mounted like this on the back of the project.


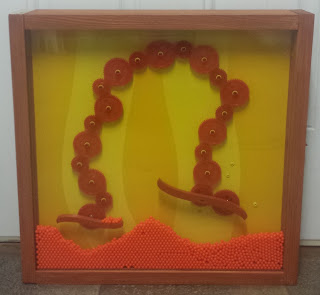
So that the front of the project looks like this:


Best seen as a video:


Sunday, September 18, 2016

Excited about pendulum possibilities

Wow, time flies when you're having fun. Since the previous post, there has been a lot of progress in the pendulum research. This is the resulting project:


The challenge of making the pendulum "bend" in the middle was accomplished by adding some weight to the bottom. This causes gravity to be one of the affecting forces of the motion.

The magnetic force that keeps it in motion is accomplished with a permanent magnet, a hand wound coil magnet and a simple transistor circuit like this one:


The next couple of projects in the queue may require a little more finesse on the strength and timing  of the magnetic pulses. So, as an alternative to this circuit, I'm looking into a programmable control circuit. More fun on the way!


Tuesday, August 2, 2016

Handy little bearings

An interesting online store called Electronic Goldmine sells these little bearings. If you have ever dismantled a computer hard drive it may look kind of familiar.


These are very smooth and have been handy for designing pendulums. 

For my purposes the little threaded nub is in the way, so the obvious choice is cut it off. Bad news is the bearing cage is plastic and the cutting process makes it hot enough to fail. Good news is a damaged bearing needs to be opened up to provide this learning opportunity.


I anticipated small bearings, but I've never seen balls this small before. Pencil tip in the photo to show scale.


Monday, July 18, 2016

Double pendulum early tests

The first experiment trying to push a double pendulum with an electromagnetic pulse resulted in two possible outcomes.

1. Both pieces of the pendulum lined up together and behaved very much like a straight pendulum.


2. The bottom half of the pendulum created enough backlash to slow down the top half. In this case, motion eventually stopped because the electromagnet did not push hard enough to overcome the backlash. 


For future tests I plan to try:

1. Push the top section of the pendulum with double the force
2. Push just the bottom pendulum 
3. Push both parts of the pendulum 

Of course none of these test will provide conclusive information because everything changes when the length of either section is changed or when the location of the magnets are changed. We'll just call this a good start.


Thursday, July 14, 2016

Electromagnetic pulse pendulum

My first foray into adding electronics to a project:


The final project will not look anything like this,
 but it was exciting to get the electromagnetic pulse working as a prototype.  


Sunday, June 26, 2016

BB project part 2

This project has absorbed an inordinate amount of time. The mechanical and aesthetic design has evolved through several changes. 


There were a number of successes along the way. 
 - I gained some experience with 3D printing.
 - I learned more about the using the Cricut vinyl cutter.
 - I learned the wrong way, then a better way to make a drilling jig. 


The axles supporting the "arms" go through the aluminum backing and one layer of acrylic. The alignment required to make all four axles work was quite challenging. In order to see an ending point on this project, I decided to adjust from four arms down to two.


As I experimented with adding more BBs to improve the visual interest, I was seeing improvement until the main drive shaft sheered.


So, this project is not complete but will be set aside for a while until some time when the perfect motor and drive axle come along to make the conclusion possible.

Friday, May 13, 2016

The BB Project

The project drawing started something like this: 


 I've worked out the mounting hardware and the appropriate hole spacing for the gears. I've had some success 3D printing the "arms."


Still having some struggles with motor choice and arm speed. I thought I was set with a battery powered motor and a nice little worm gear combination but it doesn't run as smoothly under load as I would like. Next try will be a synchronous motor, which will have its own mounting challenges.


Lots of trial and error yet to come on the shelf steps. Hoping to find a functional and aesthetically pleasing combination. 


The wood background you see here will be replaced by clear plastic so you can see the gears moving.


The BB pick up by the rotating arm works as well as I could hope. Finished product is still several steps away.